How to create a coiled cable shader in UE4
A handful of moons ago, Magnopus UK undertook a project which heavily featured an interactive CB radio, complete with a springy-coiled handset. As it was such a key element of the project, it was important that the coil reacted convincingly as you moved the handset about. This article takes a look at the process of determining the most suitable method for achieving this, as well as the implementation.
- Telephone model by Nikita Bulgakov. Modifications — Cable geometry removed from source model, textures replaced with blue material.
Early approaches
One approach we considered, was authoring the cable as a spline mesh. This would involve drawing the profile of the coiled cable as a spline, and then using this as a path to deform a tessellated cylinder along. We threw this approach out at the idea stage, as we considered it would be too costly to render, and potentially too complicated and unwieldy to implement alongside a cable simulation.
Another approach would have been to construct the geometry for the coiled cable every frame, much in the way that the cable component already constructs its standard, cylindrical geometry. This would, no doubt, have given us the best results. However, generating this mesh data every frame again proved too costly, which led us to our final solution — a shader approach using UE4’s existing cable component as a canvas.
The Cable Component
Thankfully, Unreal has an excellent simulated cable component that is part of the Cable Component plugin that’s enabled by default. It uses a well-known technique called ‘Verlet Integration’ to simulate constrained points along the length of the cable, and then procedurally constructs the geometry from each point. If you want to learn more about UE4’s cable component and Verlet Integration, the documentation here is an excellent resource!
The data that’s important for us to understand when constructing the shader is how the normals and UVs are calculated. The UVs are extremely logical, in that the UV coordinates are normalized across the length of the cable and the circumference of the cable.
Image to demonstrate the UV coordinates of the cable component. Notice the seam, where the top and bottom of the UVs meet.
You can tile the UVs along the U coordinate as an option in the Cable Component. However, we handled this tiling in the shader to keep the spiral cable visual controls together, which we felt was a fair trade of usability over runtime performance.
The vertex normals are equally logical, in that they point outwards from the centroid of each cross-section.
Once we understood how the mesh was constructed, we could begin to implement the shader.
Creating the spirals
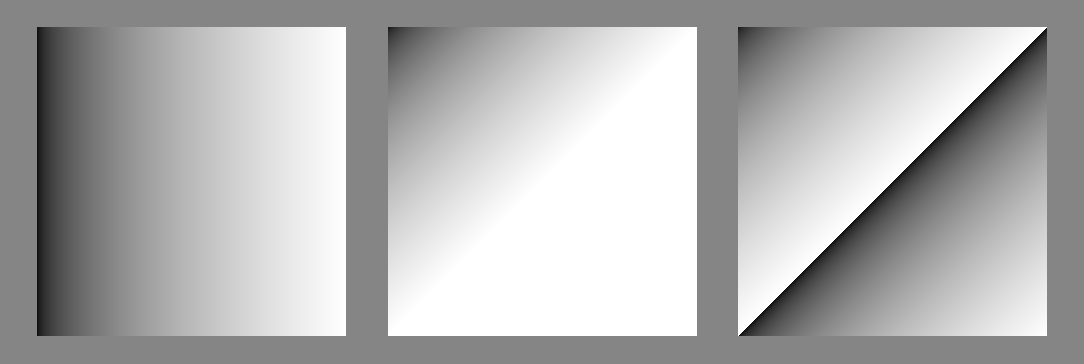
To implement a shader like this, the first thing we want to do is create our ‘spiral’ pattern. To achieve this, we simply take the U coordinate and add it to the V coordinate.
Given normalized UV coordinates, this gives us a perfect 45-degree gradient, values ranging from 0 (top leftmost pixel) to 2 (bottom rightmost pixel).
The last part of the puzzle is to wrap these values so that they always output a value between 0 and 1. We can use ‘frac’ to return the fractional part of the input, which gives us exactly the result we want.
From left to right: Isolated U channel, U + V, fractional part of U + V
If we preview this on a cylinder, you can see that the spiral result is seamless and wraps perfectly around the circumference.
Image to demonstrate how the skewed UVs result in a seamless spiral.
Now, to add more spirals, we simply need to multiply the U component by the number of spirals we want. You may want to consider flooring this value, as fractional values will not have a seamless result.
Example of adjusting how many times the spiral wraps around our cable.
Handling this in the shader also means that we can have as many spirals as we like, without incurring a higher triangle count, as the geometry-led solutions would have done.
Once we have a linear gradient that spirals seamlessly around our cable, we can use this data to drive the normals and thickness of our spiral cable.
Constructing the normals
To construct the normals, we want to evaluate the linear gradient and output different directions. To do this, we can use the handy ‘3 Color Blend’ node — which, given an alpha, blends 3 colours (or in our case, direction vectors) linearly. We just need to supply the 3 direction vectors, which will be: left (-1,0,0), up (0,0,1) and right (1,0,0), and we’ve constructed our normals! We can then transform this vector from tangent space to world space, before plugging it into the result node of the material (in our case, we opted out of using Tangent Space Normal in the material as we were constructing the normals in the shader — this saves on a few shader instructions!)
Example of our constructed normals responding to a spotlight source
Handling cable separation
We’re getting there, but our cable does not separate! We want our cable to separate and conserve the cable thickness as it is stretched, giving the illusion that the cable is stretching apart.
This will, by necessity, need to be driven by a shader parameter value determined in-game logic, but for now, we just need to implement the functionality in the shader for us to hook up.
To handle this, we can simply scale our linear gradient from its centre, using the following formula:
Example of the shader graph for scaling the gradient by its mid point
The frac node is the result of our linear spiral gradient; we divide this by our cable width to scale it accordingly, before adding 0.5 (half of our normalised linear gradient) and subtracting 0.5 over our cable width in order to reposition the gradient so that it is centralised. Next, we saturate the output so that we don’t return values outside of the 0 to 1 range.
Finally, we need to invert the gradient and find the min value between this and the original, non-inverted gradient, before multiplying by two. This creates a gradient from 0 to 1, and back down to 0.
From left to right: The original gradient, the inverted gradient, the min value of both gradients, the re-normalized gradient.
This gives us something that resembles a height map for the circumference of the cable, which we can use to cut-out the spiral. We only need to pass this into the opacity mask pin of the result node after evaluating all values above 0 as 1, using an if statement node.
An example of adjusting the cable width property in the shader — we’ll be poking this programmatically later!
As we’re using the same scaled gradient to drive our normals as our opacity, the normals scale appropriately too from the same input.
Now would be a good time to set your material to two-sided, if you haven’t already, so we can draw the spiral cable on the back-faces of the cable geometry too.
Handling the silhouette
Now our cable is looking a bit more voluminous, but the dastardly silhouette is giving it away!
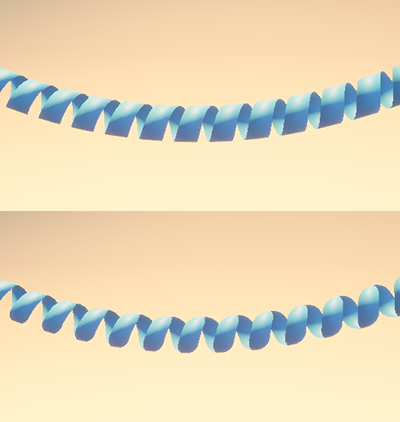
It’d be much nicer if the cable was rounded along its profile. We generated a height map in the previous step, so why not resolve this against the profile of the cable from the given viewing angle, and attenuate the opacity falloff appropriately?
From top to bottom: Non-attenuated silhouette, attenuated silhouette
We can do this by getting the camera vector from each pixel and transforming it from world space to tangent space. We can then evaluate the ‘G’ channel to determine the direction of the pixel for the viewing angle. From this, we can construct what amounts to another height map that spans the length of the cable horizontally.
Given these two height maps, we can then attenuate our scale value based on how close the pixel is to the edge of the cable, giving the illusion that the cable has rounded depth.
We found this method to be much more reliable than using a fresnel function, which broke the illusion at certain glancing angles.
Our method (left) vs fresnel (right), notice how the profile breaks up at certain angles with the fresnel method
Tying it all together
Once we have finalised our cable shader, we need to hook it up to some logic, so that it comes apart as we stretch it out and coils back up again when we ease the tension.
All we need to know in the shader to drive this is the current length of the cable. We can evaluate this on the CPU, either by naively querying the distance from the start and endpoints or — a better approach — by deriving the cumulative distance between each particle of the verlet integration simulation.
Once we have this value, we just need to update the Cable Width parameter based on the length of the cable. Here’s the naive implementation that can be done without having to poke around the source code for the UCableComponent:
Et voila! You have yourself a springy, coiled cable!
There are a handful of other things we implemented, such as a smoothstep to handle falloff of the cable’s edges, as well as shrinking the cable along its vertex normals when stretched out.
In conclusion, we were able to simulate the look and feel of a coiled cable in the shader, without the need for supporting spiral geometry. There are many more things you could do to extend this system — why not experiment and see what you come up with?


